
One of Microsoft's main concerns had been that of maintaining backward compatibility with previous products. As such, the WIN9x products (except WINMe) were hybrid OSs, consisting of a 16-bit component plus a 32-bit component. To further enhance their ability to run DOS applications, these products shipped with DOS 7.0.
With the release of Windows NT 3.51, this all changed. Although NT did have a command prompt, it did not support any version of DOS. It was a purely a 32-bit OS with only rudimentary support for 16-bit code. Microsoft's goal here was to provide a faster OS that exhibited greater stability. Windows NT (WINNT) was the first in a growing line of products that have pursued that goal.
While there would not be an official release of a product with NT in the name until 1993, Microsoft began work on the concept of a 32-bit OS in 1988. A gentleman by the name of David Cutler, Sr., moved over to Microsoft from Digital Equipment Corporation (DEC), bringing to Microsoft a profound knowledge of OS architecture. Most notably, Cutler had been involved with the development of DEC's Virtual Memory System (VMS).
By 1991, Microsoft had developed a version of NT that it considered stable enough to demonstrate at the Microsoft Windows Developers Conference. Designated NT 3.0, it was never deemed stable enough for a public release, but it still possessed most of the features that were to become the NT core.
What happened to versions 1.0 and 2.0? They never existed. Microsoft doesn't explain the reasoning behind their version numbering system, but here are the two most popular explanations:
Fortunately it isn't something that's covered on the exam. I simply thought it interesting enough to mention.
In July of 1993, Microsoft released the first version of NT designed for public consumption, Windows NT 3.1. There were two separate releases of this OS. NT 3.1 was an OS designed for high-end desktops, and NT 3.1 Advanced Server was Microsoft's first foray into a true network operating system (NOS).
NT 3.1 could never be mistaken for a bastion of stability in any respect. It had a number of issues that prevented it from really taking off as an enterprise-level product. Still, for Microsoft, this OS broke new ground in several respects. It was a true 32-bit OS.
On a more familiar note, one of the biggest claims to fame for NT was that it became the foundation over which future Micro soft products would be developed. It was the first to abandon 16-bit code as part of the architecture, although it did continue to provide support for running 16-bit applications. More notably, it was the first OS to separate the hardware interface from the applications interface. Applications could no longer make direct calls to the hardware.
EXAM NOTE: It is a key point that NT was Microsoft's first true 32-bit OS. WIN9x was touted as being a 32-bit architecture, but in reality it was a hybrid OS, running both 16-bit and 32-bit code.
Microsoft continued to work out the kinks in the NT code, and a year later, in September of 1994, NT 3.5 was released. This version proved to be much more stable. More notably 3.5 also introduced internetworking capabilities that allow Microsoft networks to mingle with Novell and UNIX networks. NT 3.5 was followed up in July of 1995 with NT 3.51.
More than just a bug fix, NT 3.51 introduced some new capabilities to NT. Features were added to make the OS more accessible to people with hearing or sight impairments. Support for the BackOffice product line made it easier to manage network applications and licensing. A desktop version of the OS, NT 3.51 Workstation, was designed to accommodate applications written for the newly released WIN95. It also provided hardware support for the new Personal Computer Memory Card International Association (PCMCIA) devices.
Still, even with all these improvements, the IT industry wasn't exactly moving toward NT in droves. If anything, there was exactly the opposite direction of movement. In 1996, Microsoft successfully reversed that trend with the release of NT 4.0. With many of the features that made WIN95 so popular, along with a massive improvement in stability, NT 4.0 became the mainstay for servers and high-end workstations for the next four years and contributed greatly to Microsoft's ascending dominance in the OS industry. The remainder of this chapter will deal exclusively with NT 4.0, as all other versions are considered obsolete.
VMS is an OS that isn't covered in the A+ exam, but nonetheless, it deserves an acknowledgment here. It is frequently credited as being the most stable OS ever written. (At one point in time, there was a computer system running VMS that had run non-stop for twelve years without a reboot.) Because of its stability, the OS still sees a lot of use in computing environments where the system can never go down.
Since Cutler was so heavily involved in the VMS project at DEC (and since he brought a big chunk of his programming team with him from DEC to Microsoft), it should come as no surprise that similarities between the two OSs abound. There are many characteristics of the two OSs that are virtually identical in both form and function:
VMS, on the other hand, isn't exactly what one would call user-friendly. Cutler and his team approached this issue, as well as the native file system of VMS, which would have been completely unfamiliar to users already immersed in the Microsoft world. To ensure that NT would be a friendlier environment to existing Windows users, Microsoft embedded the WIN32 API and the NTFS file system. The result was a more stable OS with a familiar look and feel.
NT 4.0 incorporated most of the features of provious versions of NT, but in many cases it took these features to a higher level. Earlier, I provided a list of ways that NT is similar to VMS. One feature that deserves a closer look is that of Symmetric Multiprocessing (SMP).
This .44 caliber term basically means that the OS is capable of utilizing the services of more than one microprocessor. When a system can do this, it runs faster and responds to user requests more quickly. However, different OSs over the years have made use of two different forms of multiprocessing. Those two forms are asymmetric and symmetric multiprocessing.
Asymmetric multiprocessing (ASMP) operating systems typically utilize the primary microprocessor (Processor 1) for the execution of operating system code. The other processors in the system run application code or process user data. Typically, an ASMP-configured machine has more than one processor, but the processors do not necessarily have access to the same memory addresses, or even the same amount of memory for that matter.
EXAM NOTE: Be prepared to be able to identify the differences between symmetric and asymmetric multiprocessing.
The vast majority of operating systems that support multiprocessing make use of SMP. This includes all versions of Windows NT. SMP allows the operating system code, application code, or user data to run on any free processor. Most hardware configurations share all available memory between all available processors.
In Chapter Two, I discussed the difference between threads of code and processes. NT 4.0 makes use of multiple threads within a single process wherever possible. As a result, different threads from the same process can be running on different CPUs at the same time.
SMP is a much more efficient utilization of multiple processors because operating system code has a tendency to hog the processor. Allowing the operating system to run on only one processor frequently results in that one processor becoming overloaded, while the others are sitting back twiddling their virtual thumbs.
All versions of NT 4.0 can take advantage of multiprocessor systems. However, the different versions have different limitations in the number of processors they can address. This will be discussed in the next section.
Microsoft shipped several different versions of NT 4.0 over the life of the product line. Each version offered different capabilities, and each one exhibited its own unique system requirements for successful installation and operation.
These are the different versions I'll discuss in this chapter:
It should be noted that there were also a number of different service packs that were issued over the life of the product. Installation of a service pack impacted the minimum hardware requirements in some cases. Later in the chapter, as I discuss service packs, I'll point out some exceptions.
EXAM NOTE: Be able to list all the different versions of Windows NT. You may be faced with questions that ask you to identify different minimum and maximum hardware capabilities of each version.
NT 4.0 Workstation (NTWS) was the OS of choice for many high-end workstations during its era. Although it could only address two processors, it was still one of the few over-the-counter OSs that supported SMP.
Another interesting addition to NTWS was Remote Access Service (RAS). The user could configure a NTWS machine to accept an incoming connection from a remote computer. While NTWS was limited to only one RAS connection at a time, this was still an improvement over previous OSs. And as with all other versions of NT 4.0, NTWS could be installed on computers powered by Intel (and compatible), DEC Alpha, Motorola Power PC, or Silicon Graphics (and compatible) MIPS processors.
The table lists the system requirements for NTWS.
| NT 4.0 Workstation Hardware Requirements: | ||
|---|---|---|
| Device | Minimum | Maximum |
| Processor | Single 486-DX33 | Two >486-DX33 |
| Hard Disk (CISC/RISC) | 110MB/148MB | 16EB |
| Memory (CISC/RISC) | 12MB/16MB | 4GB |
| Graphics | VGA | VGA |
| Pointer | Mouse or trackball | Mouse or trackball |
| Note that the minimum requirements differ between a CISC installation and a RISC installation. | ||
NT Server was designed to be a full-blown NOS, providing a scalable architecture that would allow networks to enjoy virtually unlimited growth. With NT 4.0 Server, Microsoft bet the bank on a domain model of networking. Under this model, all users, servers, workstations, and other devices that were under the administrative control of a single collection of security data became the domain. This information was stored on one computer called the Primary Domain Controller (PDC). The PDC provided security control and logon authentication services for every user and device on the domain. Other computers, called Backup Domain Controllers (BDC), can maintain copies of this database, but only the PDC maintains an original. This information is stored in the Security Account Manager (SAM). However, SAM is part of the registry, and there is a built-in limitation to the maximum size to which the registry can grow.
By default, NT sets the maximum registry size to 25 percent of the paged pool. The paged pool consists of all data currently stored in RAM that can be written to the hard disk in order to free up physical RAM. The maximum size of the paged pool in NT 4.0 is 128MB; therefore, the default maximum size of the registry is 32MB.
If the administrator requires a larger registry, it is simply a matter of changing one of the entries in the registry. This can be done by editing the registry, but it's safer and easier to use Control Panel. In the System Applet, under Performance, registry size can be configured either in megabytes or as a maximum percentage (up to 80 percent of the paged pool). The minimum size that be configured is 4MB. Since the paged pool is limited to 128MB, then the maximum size is 102.4MB.
Hardware requirements for the server versions vary in maximum capabilities. However, minimum requirements are consistent. The table lists minimum and maximum requirements for the different server versions.
| NT 4.0 Server Hardware Requirements | ||||
|---|---|---|---|---|
Device | Minimum Hardware Required | Maximum Hardware Configuration | ||
| NT Server | Enterprise | Terminal Server | ||
| Processor | Single 486-DX33 | Two Processors No maximum speed | Eight Processors No maximum speed | Four Processors No maximum speed |
| Hard Disk | 125MB/160MB (CISC/RISC) | 16EB | 16EB | 16EB |
| Memory | 16MB/16MB (CISC/RISC) | 4GB | 8GB | 4GB |
| Graphics | VGA | VGA | VGA | VGA |
| Pointer | Mouse or trackball | Mouse or trackball | Mouse or trackball | Mouse or trackball |
Increased security was a key issue for Microsoft during the developmental phase of NT 4.0. This security tightening began at the logon screen and worked its way down into the basic architecture of the OS.
Previous versions of the software had users logging on from a prompt that was little more than an elegantly designed DOS screen. As a result users and network administrators could easily find themselves victims of a malicious piece of software called a Trojan Horse. A Trojan horse is a piece of software that mimics the look and function of another piece of software familiar to users, but in reality it is performing a completely different function all together.
One of these Trojan horses particularly embarrassing to Microsoft was a program that was designed to look, feel, taste, and smell just like the logon screen for Windows NT. When users typed in their user IDs and passwords, nothing appeared to happen. All too frequently, this resulted in a frustrated user calling the network administrator down to fix the problem. And what was the first thing this person would do? Type in his or her user ID and password, of course! But the program wasn't doing nothing. It was doing something. It collected all those user IDs and passwords into a file that the attacker could come and collect at leisure.
EXAM NOTE: My discussion of OS security and the logon process is probably a bit more detailed than really required for the CompTIA exam. However, it's basic OS information with which any IT professional should be comfortable. One key point that is brought up on the exam a lot is the logon security added to protect against Trojan horses. File system security is also covered.
With the release of NT 4.0, logging onto the system is mandatory. To do so, the user must press Ctrl+Alt+Delete to begin. On older DOS-based computers and those with DOS programs, this key sequence resets the computer. With NT it brings up the logon screen. This is the door that locks out the Trojan horses, because as DOS-based programs, the key sequence will give them away.
The basis for internal security on an NT network is grounded in the concept of permissions and privileges. This is one of those situations where two words mean the same thing, only different. Permissions apply to various resources on the network and whether or not a specific user has access to a specific resource, and if so, just how much control that user can have over the resource. Privileges dictate what actions or functions a user can perform on his or her own system or on the network in general.
Permissions have been around the OS world for a long time and tend to vary slightly from one OS to the next. The Microsoft world is divided into two different forms of permissions. There are share level and user level security.
Share Level Security:
Share level permissions are attributes that are assigned directly to a specific resource on the network. For any given resource, there will be a specific password that will allow access.
Access comes in one of four different forms:
A problem inherent with share level security is that for every resource, there is a password. If 200 users have all created 10 files, each with a different password, then if you want to be able to access all 2,000 files, you need to know 2,000 passwords. That's handy, isn't it?
User Level Security:
That's why network OSs all employ user level security. With user level security, the user is assigned a user ID and password. These are the user's credentials. When the user logs on, he or she types in the credentials, and from that point forward, the permissions granted to that user control access to any given resource on the network. As a result, user level security makes heavy use of file system security.
With file system security, file and folder level permissions are used. But unlike share level security, access is controlled by a centralized security database. This is the SAM I discussed earlier. File system security is much more granular than share level. Any given permission on a resource can be specifically denied to a given user or group.
There are also a number of other different permissions that can be assigned:
The more astute reader may notice that there is no mention of a No Access permission in the preceding list. No Access would be the permissions level one might expect to see that blocks a user from even knowing a file or directory even exists. The administrator can accomplish No Access simply by denying Full Control.
There is, however, more to network security than simply accessing data. There is a lot of administration that needs to be done and a lot of administrative functions that the administrator doesn't want just anybody doing. For example you don't want just anyone to have the right to go in and change other peoples' passwords. You don't want just anyone to have the right to shut down the server.
Privileges are administrative rights allowed by the system. These can either be assigned directly to a user on an individual basis, or they can be assigned by adding a user to one of NT's built-in groups. Most administrators prefer the latter approach. Built-in groups in NT vary slightly between NT Workstation and the versions of NT Server.
The table lists the built-in groups for all versions along with the privileges that go with those groups.
| NT 4.0 Built-in Group Privileges | ||||
|---|---|---|---|---|
Local Group Name | Default Members | Who Can Modify? | Inherent Privileges | Available on Workstation or Domain Controller |
| Account Operators | None | Administrators, Account Operators, Server Operators | Create, delete, modify user accounts and groups. Cannot modify the Administrators or Server Operator groups. | Domain Controller |
| Administrators | Domain Administrators, Administrators | Administrators | Create, delete, or manage user accounts and groups. Manage resource shares. Grant resource permissions. Install programs, OS patches, and device drivers. | Workstation, Domain Controller |
| Backup Operators | None | Administrators | Backup and restore servers and workstations. Logon locally. Shut down the server. | Workstation, Domain Controller |
| Guests | Guest | Administrators, Account Operators | None defined. | Workstation, Domain Controller |
| Power Users | None | Administrators, Account Operators | Install programs, OS patches, and device drivers. Manage local printers. | Workstation |
| Print Operators | None | Administrators | Share and remove sharing printers. Manage printers. Logon locally. Shut down servers. | Domain Controller |
| Replicator | None | Administrators, Account Operators, Server Operators | Used with the Directory Replication Service. | Workstation, Domain Controller |
| Server Operators | None | Administrators | Share and remove sharing resources. Format the server disks. Logon locally. Backup and restore servers. Shut down servers. Lock and unlock servers. Install programs, OS patches, and device drivers. | Domain Controller |
| Users | Domain Users | Administrators, Account Operators | None defined. | Workstation, Domain Controller |
| The built-in groups in NT are a convenient way of managing user privileges. | ||||
Earlier in the chapter, I discussed how account information was stored in the SAM. Here, I will talk about how SAM is used to keep the network secure, with a little help from another piece of NT architecture called the Local Security Authority (LSA).
I'll start with how a user's account is actually managed by SAM. When the network administrator first creates an account for a new user, that user is assigned a user ID and (usually) a password. Most users think that it is this user ID and password that is their key to the network. As far as they're concerned, it is. But SAM could care less about that. It's looking at a number called the Security Identifier (SID) that is generated by the system when the account is created. As long as that account remains on the system, that SID follows the user wherever he/she goes.
When the user first logs onto the system (after having pressed Ctrl+Alt+Delete, of course), a process called WinLogon passes the user ID and password that are entered to LSA. LSA compares the information provided by the user to that which is stored in SAM. If the data is correct, the user is allowed onto the system. If not, that user is rejected. Across a network, LSA will transmit this information to either a PDC or a BDC.
When a user is successfully logged on, LSA will generate a security access token that validates the user's session on the network. That token is the key to network resources. If the user logs off and then back on, a new token will be generated. The token includes the following:
Now that the token has been generated, WinLogon opens a new session of EXPLORER.EXE. The access token assigned to the user is attached to this process, and from that point forward, everything the user attempts to do must be validated by the token.
Users aren't the only targets of system security. NT security treats every single resource on the system, including the users, as objects. All of these objects are defined by a specific security descriptor. The security descriptor is a token that defines the security attributes of a specific object. In many cases, by default, this security is minimal unless the administrator chooses to increase it. The security descriptor comprises four components.
The first two are the individual SID and the group SID discussed in the previous section. Another component called the discretionary Access Control List (ACL) identifies what users and groups are allowed to access a particular object. The system maintains its own ACL, conveniently named the System ACL, that oversees all security descriptors. The System ACL is used by the system for internal security audits when defined by the administrator and is what allows an administrator to set and enforce security policies over the entire network.
Now let's go back to those discretionary ACLs for a moment. As I mentioned, it is the discretionary ACL that defines what users and groups are allowed to access a specific object. I called it a list, but what is it a list of? The ACL consists of a series of Access Control Entities (ACE). Each of these entities either grants or denies access to the object for a specific user or group. It does this on the basis of the permissions granted to that user.
The process of access validation is what makes all of the preceding work the way it does. When the user attempts to access an object for the first time, an NT function called the Security Reference Monitor (SRM) examines the user's access token and compares it to the object's ACL. Each ACE in the ACL is read in the order it is listed. No Access entries are all listed first. This reduces system overhead for processing requests that won't be honored anyway. Once any ACEs in the ACL specific to the user's token indicate that the user should be allowed access, SRM opens the object to the user. Is it just me, or are there too many acronyms in this industry?
As a result of these registry limitations, there is an inherent limitation to the number of user accounts that can be stored on a single machine. If the network begins to get too large for a single PDC to manage, the administrator has several options available. These options appear as the different domain models available to NT. Microsoft defines four different domain models:
But before I get into a heavy discussion of NT's domain models, perhaps it would be a good idea to define the concept of a domain. Earlier Microsoft OSs, starting with Windows for Workgroups 3.11, included rudimentary built-in networking support. These OSs depended upon the concept of the workgroup for network management and communication. Simply put, a workgroup is a collection of devices on the network that share common resources and (usually) common responsibilities. This concept was fine for small networks but was virtually unusable for enterprise level networking.
The domain allows for much greater expansion and tighter control of the network. The domain consists of all users and resources that are under the oversight of a single administrative unit. Since large numbers of smaller networks can be combined into a single large network and still be under the control of a single PDC, domains can become quite large.
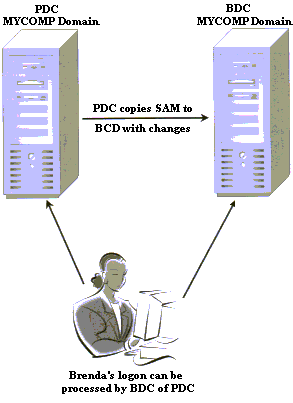
Under the Single domain, there is only one PDC that controls the entire network. All changes to the network infrastructure must be recorded on the PDC. This is where the master copy of SAM is stored. Additional BDCs may be used for balancing the load of logon requests for networks with large numbers of users. However, BDCs only maintain copies of SAM. These copies are updated from the PDC periodically in a process called synchronization, where the PDC checks with all BDCs on the network. If SAM has changed since the last synchronization, a new copy will be sent.
With the Single Master domain, there is still only a single PDC that houses the SAM that manages user accounts. However, there are one or more additional domains called Resource domains that maintain the security for some aspect of the network other than users.
An example of a Resource domain would be as follows: An organization might have a very large managed database with extremely critical security requirements. Access requirements for this database vary greatly from user to user. The network administrator has a reputation for being the best there is at overall network design, management, and maintenance. Unfortunately, what he knows about database management can be engraved on the sharp edge of a razor blade-with room left over for the Gettysburg Address.
Fortunately, the company also has an expert database administrator. She's the best there is at what she does, but neither knows, nor cares, what goes on in the overall workings of the network. The Single Master domain model provides the perfect solution. Two domains are created. The network manager assumes control of the user domain while the database administrator takes over the resource domain. Then the two administrators establish a trust between their separate domains.
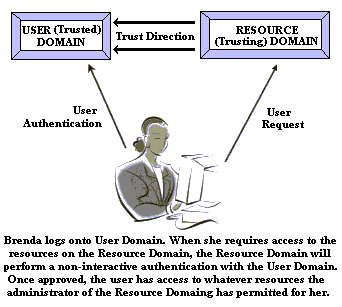 A trust is a link between two domains over which user authentication is performed on one domain, but the permissions and privileges associated with that user's accounts are honored on another domain. In a trust relationship, there is a trusting domain and a trusted domain. The trusting domain is the domain that allows user authentication to occur over there on somebody else's domain. It trusts the authentication to be accurate. The trusted domain is the domain that maintains the SAM for the user account that is being verified.
Trusts are only one-way. There is no such thing as a two-way trust in the Windows domain structure. For a two-way trust to exist, a separate trust must be established in each direction on an NT network. For that to occur, the administrators of each domain must be actively involved, or one or the other of the administrators must know the user name and ID of the other.
Another thing about trusts in an NT 4.0 network is that trusts are nontransitive. This means that if I set up a trust between Domain A and Domain B, and then another trust between Domain B and Domain C, a trust between Domain A and Domain C will not be created by default. If I want that trust to exist, I will have to create it separately.
Under the Single Master domain model, there can be as many Resource domains as the organization requires, but as I've already pointed out, there will be only one Master domain that is managing authentication. Setting up multiple Resource domains allows for a tighter reign on security.
Some organizations reach the point where a Single Master domain isn't sufficient. This can occur when the number of user accounts and groups exceeds that which a single PDC can manage. And it can also happen when security issues dictate that different groups of users be separated from other users on the network. This is where the Multiple Master domain (Figure 25.4) comes into play.
With the Multiple Master domain, two or more PDCs are configured, each managing a different domain. Each of these domains is handling user authentication. However, unless trusts are established between the different domains, they can't see one another on the network.
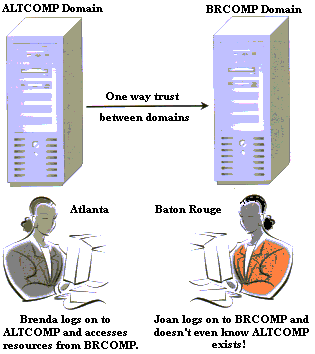 For example, a company might have an office set up in Baton Rouge and another set up in Atlanta. The network in each office is managed by its own domain. The Baton Rouge office is BRCOMP and the Atlanta office is ATLCOMP. When a user logs on in Atlanta, if there is no trust established between Atlanta and Baton Rouge, then that user isn't even aware that the BRCOMP domain even exists.
This structure gives the administrators a bit of leeway in how they want to handle user access. For instance, if there is a pressing demand for the BRCOMP users to be able to access resources in the ATLCOMP domain, but not the reverse, then the administrators of the two domains might want to establish a single trust in which ATLCOMP domain trusts the BRCOMP domain, but not vice versa. ATLCOMP shares out the resources required by BRCOMP and then assigns permissions as it sees fit.
As with the Single Master domain, Resource domains can also be established to manage specific resources on the network. These are handled in exactly the same manner as I discussed in the section on the Single Master domain. As a result, a very complex network might have five Master domains and a dozen different resource domains, or even substantially more. Networks are practically limitless in terms of scalability.
The most complex of the NT domain models is the Complete Trust. In this scenario, a number of different Master and Resource domains are created, and every domain on the network trusts every other domain on the network in both directions. This model requires a literal maze of trust relationships and a massive amount of administration in terms of individual user and/or group access requirements between the domains.
Generally, this approach is not the most favorable, and where it exists, it usually exists by accident. An example would be a network that just seemed to keep growing. As each new domain was added, the administrators simply decided it was easier to simply establish trusts in each direction between their own domain and the new one. This prevents the administrators from having to make too many complex decisions, but it does lead to an overly complex and cumbersome network that is full of security holes.
As with previous Microsoft OS versions, there are two ways to install NT as the only OS on the system. The best and safest method is the clean install. However, as with other Windows versions, there is also the option for an upgrade. All of the possible problems that exist with upgrades are also apparent in an NT upgrade.
A third option with NT is to create a dual-boot system. This option allows the user to boot the system either to NT or to another OS installed onto another partition on the hard disk. I will discuss dual-boot systems toward the end of this chapter.
Many older machines won't boot to the CD, so it is essential for those users to have access to the installation disks. Even if you can successfully boot to a CD, it is a very good idea to keep a set of these diskettes on hand at all times. In recovery mode, the CD drive is quite often not readable.
To create the three boot diskettes for NT, have three blank formatted 1.44MB floppy diskettes available and label them "NT Installation Disk One," "NT Installation Disk Two," and "NT Installation Disk Three." Insert the CD into the drive of any working DOS or Windows machine. Open a command prompt and browse to the i386 directory on the CD-ROM. From the command prompt, type WINNT /OX. (The command is not case sensitive). Read the prompts carefully. You'll note that the process creates disk three first, then disk two, and finally the boot diskette.
Regardless of the installation method you chose, there will be four separate phases to the NT installation process:
The initial phase begins in one of two ways. If this is a clean installation onto a new hard drive then the installation file that will be used is WINNT.EXE. For the installation to succeed, the hard disk must already be prepared with a DOS partition to hold temporary files. This is a 16-bit file, and it only recognizes FAT16 for this installation partition. Therefore, if the FDISK utility from a WIN9x boot diskette was used to prepare the hard disk, and Large Disk Support was selected, then WINNT.EXE will not be able to recognize the disk.
If the computer can boot to a CD-ROM drive, then the installation procedure is as simple as inserting the NT 4.0 CD into the drive and booting the computer. If for any reason the system cannot boot to a CD, then the user will have to use the installation diskettes. This is a set of three diskettes that shipped with the product. If the diskettes have been lost or damaged, do not despair. They can be recreated on any DOS or Windows-based machine. See the sidebar for instructions.
After the system has booted, WINNT.EXE will create a temporary directory called $win_nt.ls$. -As. This is where all the files required for installation will stored for the remainder of the process. Once installation has been completed, WINNT.EXE deletes that directory and all the files it holds. Once in a while, if for any reason an installation is aborted and subsequently resumed at a later time, this temporary directory remains on the hard drive. When installation is complete, if that directory is still there, it is safe to remove it.
After all the files are copied, you are prompted to remove any floppy diskettes from the drive and the system reboots. Now the installation enters the text phase. A program called NTDETECT.EXIE scans the system for any installed hardware and generates a list of drivers that will be installed. (Note that NT 4.0 is not a PnP OS.) You will be prompted to press F5 if there are any hardware devices that are not internally supported by NT, such as SCSI adapters, which require installation of third-party drivers. This notifies WINNT.EXE that during the driver installation, it should prompt you to insert the floppy diskette with those drivers. Note that WINNT.EXE will not read drivers from a CD-ROM during installation.
If the system onto which you are installing NT is a multiprocessor machine, it is likely that you will be prompted to enter a disk supplied by the motherboard or system manufacturer. SMP machines require an updated version of a file called HAL.DLL. If this is not installed during the initial installation, it can be added later. But until that time, the system will be making use of only one CPU.
In a server installation, this is also the phase in which you are asked to enter the type of licensing you wish to use. The two options are Per Server and Per Seat. With Per Server licensing, the administrator fills in the number of Client Access Licenses (CAL) that have been purchased. Only that number of users can access the server at one time. This is useful for organizations that use shift workers. For example if there are three shifts of 100 users, but each user has a dedicated computer assigned, there might be 300 computers, but only 100 users will ever be logged on at any one time. Per seat requires a CAL for each workstation on the system.
Finally, during this phase you are asked to select the partition on which you want NT installed. WINNT.EXE also asks whether you prefer to use FAT or NTFS. Note that this is FAT16, and if this file system is selected, the subsequent limitations of that system are selected as well. NT does not support FAT32. After the partition and file system have been selected, a quick scan of the disk is performed and the system reboots once again. If the NTFS file system was selected, during this reboot a utility called CONVERT.EXE converts the hard disk partition's file system from FAT to NTFS. This might take a few minutes.
When the reboot is completed, the NT installation enters the GUI phase. Now you have access to all those pretty little boxes with the Next and Back buttons. The mouse has suddenly come alive, and everything is now point and click. During this phase you will be prompted to enter a computer name and password for the administrator account. Other wizards automatically open that run through the installation of any modems and set up networking.
At one point you are asked whether the computer should obtain its address automatically from a DHCP server. DHCP stands for the Dynamic Host Configuration Protocol, which is a protocol that automatically hands out IP addresses (and other information) for networks using the TCP/IP protocol. If this is an NT 4.0 Workstation installation and you know for sure that there is a DHCP server on the network, you might want to select this option. If this is a server installation, a static IP address should always be assigned. For more information on configuring TCP/IP, refer to "The Compete Guide to Networking and Network+", by Michael Graves.
Toward the end of the GUI phase, you will be asked whether you wish to create an Emergency Repair Diskette (ERD). The ERD is useful for repairing an NT installation gone bad and will be required if you wish to perform one of those dual-boot installations to which I alluded earlier in the chapter. The cautious type selects Yes for this option and inserts a blank, formatted 1.44MB floppy diskette into the drive.
I don't. I wait until the installation is completed and all third-party device drivers are successfully installed, and then I create the ERD manually. I'll have instructions on how to do this later in the chapter. But take note that the ERD should be updated any time system configuration changes or after the addition of new accounts. The ERD is definitely not a one size-fits-all type of disk.
After the GUI phase is completed, the system reboots yet again. This time it boots to a working NT machine. However, for the vast majority of users, this isn't the end of the installation process.
This is a phase that doesn't seem to appear an a lot of the books I've seen. However, before the system can be used, there is generally a bit more work to do. Any third-party device drivers that weren't detected by NTDETECT.EXE must be installed before the device will work properly.
Typically the graphics card will have to be installed separately. Until this happens the system will only be capable of 640x480 resolution at sixteen colors. This is because NT does not maintain a substantial collection of drivers for video adapters and simply installs standard VGA.
Many network cards need to be installed separately. You'll know if yours is one of those, because during the GUI phase you weren't asked to set up networking. Therefore, if your NIC didn't install, you'll have to do it manually. There will be a discussion of installing device drivers in NT in Chapter twenty-six, Windows NT Architecture. When this process has been completed and you have a fully configured NT system, it is now time to create (or update) the ERD.
I cannot emphasize the importance of having an updated ERD for Windows NT. Just installing an NT system is work enough. All of the configuration and creation of user accounts adds to that burden. The less work you have to redo should you have to rebuild the system, the happier you'll be.
The ERD contains all the configuration data for the system, along with a list of user and group accounts that have been added. Proper use of this disk allows the administrator, in many cases, to repair a corrupted system without losing everything.
Reds are managed through a utility called RDISK. There is no icon for this utility, and it doesn't have an entry in the Start menu (although if you desire, you can create either one). To run RDISK for the first time, you must open a command prompt (or click Start - Run) and type RDISK in the command prompt.
A little window will open with two buttons. One says Update Repair Info and the other says Create Repair Disk. If you select the first option, you will need to have your existing ERD in hand. It won't create a new one from scratch. That is the purpose of the second option.
Once in a while, it becomes necessary to have access to more than one OS at any given time, but there is only one computer on which an OS can be installed. For example, you may be perfectly comfortable with your existing OS, but it becomes necessary for some reason to introduce a new one. A dual-boot system gives you access to the OS you're comfortable with until such time as you have mastered the new one.
If you wish to create a dual-boot system running NT 4.0 as one of the OSs, then there is a specific order in which you must do things. And there are a couple of things to be considered. You have to prep your hard drive, and the order in which you install the OSs is important.
If you are planning to dual-boot your system, you might want to consider this when preparing your hard drive. Although it isn't absolutely necessary to have NT on a different partition if both it and your other OS are using FAT16, I would still strongly advise it. Putting each OS on a separate partition is absolutely necessary if NT is going to be on an NTFS partition. In fact, I would strongly recommend a dedicated disk drive.
With NT you need to complete the NT installation first and make sure that it's properly configured. All device drivers should be installed, and configurations adjustments such as display settings should be to your satisfaction. Now either update the ERD or create a new one.
Reboot the machine to the installation disk of the second OS and perform that installation. 'When that is completed, you'll be aghast to realize that all your hard work installing NT was to no avail. The new OS wiped it out!
Don't panic. Simply start the NT installation either from the CD or by booting to the boot floppies. However, this time, instead of selecting a fresh installation, tell '\XTINNT.EXE (or WINNT32.EXE if you're running from another Windows application) that you want to repair an existing installation. That will be the second option on the checklist. Have your ERD ready and follow the prompts as they appear. When your machine reboots after completion, during the boot process you will be presented with a menu giving you thirty seconds to pick which OS to load. If you don't make a selection, NT 4.0 will load by default.
When making a dual-boot system, decide in advance whether or not you're going to need to be able to access files created by one OS when running the other. Not all file systems work well together, as I've already pointed out. If you're setting up a dual boot between NT 4.0 and WJN9x, it can be particularly problematic. Choosing NTFS as the file system for NT will prevent the WIN9x installation from even seeing that the NT partition is present on the system. Likewise, selecting FAT32 for WIN9x will prevent NT from seeing the WIN9x partition. The only mutually accessible file system between the two OSs is FAT 16.
NT is designed to be an OS that supports a multitude of users. This is true whether it's NT Workstation or one of the server versions. In order to ensure that each user has his or her own unique operating environment, NT makes use of separate profiles for each user. A profile is simply an overview of individual user settings and preferences.
As discussed in Chapter twenty-three, the registry contains two different root keys to define users. HKEY_CURRENT_USER defines the user that is currently logged on, while HKEY_USERS contains the information for every user that has an account on the system. To create individual user profiles, NT also stores this information in the %SystemRoot%\PROFILES folder in a file called NTUSER.DAT.
Profiles can be treated in one of two different ways. A more permissive administrator will allow each user to create a unique profile that reflects individual work habits and personality. This might include the ability to install personalized screen savers, desktop backgrounds, and programs. Conversely, an administrator might think this practice is too risky and may prefer to enforce a standard profile. This is something that NT allows as well.
Microsoft's first implementation of a true 32-bit OS launched the company's ascendancy to the position it now holds as the largest manufacturer of operating systems in the world. The server versions of Windows represented its first line of NOS that genuinely addressed the needs of an enterprise.
In this chapter I introduced some of the key features of the different versions of the OS. I spent a great deal of time on the security implementations Microsoft added and defined its different domain models. This is all information that will serve you in good stead in later chapters, as these are features that will be compared and contrasted in discussions of later Microsoft operating systems.
CompTIA exam objectives covered in this chapter include the following: